Archive
Factory pattern Vs Abstract Factory pattern
Factory: A factory that creates objects that derive from a particular base class.
Abstract factory: A factory that creates other factories, and these factories in turn create objects derived from base classes. You do this because you often don’t just want to create a single object (as with Factory method) – rather, you want to create a collection of related objects.
Real Life Example. (Easy to remember)
Factory
Imagine you are constructing a house and you approach a carpenter for a door. You give the measurement for the door and your requirements, and he will construct a door for you. In this case, the carpenter is a factory of doors. Your specifications are inputs for the factory, and the door is the output or product from the factory.
Abstract Factory
Now, consider the same example of the door. You can go to a carpenter, or you can go to a plastic door shop or a PVC shop. All of them are door factories. Based on the situation, you decide what kind of factory you need to approach. This is like an Abstract Factory.
The Object Class
The Object class is a special type that is the base class for all other classes and types, including the value types. It defines a set of methods that are therefore inherited by every other type that is defined within the .NET framework class library.
What is the Object Class?
The Object class, held in the System namespace, is the base class for all classes and data types, including the value types. It is the class at the root of the .NET framework class library’s entire type hierarchy.
System.Object defines several public and protected methodsthat, due to inheritance, are automatically made available to all .NET classes, structures and types, including any classes or structures that you create yourself. If you create a class with no base class specified, it will implicitly derive functionality from Object.
Often developers overlookthe Object class. However, its importance is significant and the complexities if its members should be understood.
object = Object
The C# programming language declares a data type named “object”. This type is simply an alias for System.Object and so the two terms are interchangeable; they differ in capitalisation but not functionality.
Object methods
The Object class defines seven base methods. Of these, five are public methods that are available to be called by external objects. The remaining two methods are protected. These are only accessible internally and to derived classes. Each of the methods is described in the following sections.
Public Methods
Equals Method
The Equals method is used to compare two objects to determine if they are equal. The comparison of the objects depends upon their types. For the value types, a bit-by-bit comparison of the two values is made. If they are a perfect match, the method returns true. If not, the method returns false.
When comparing reference types, the values of the two references are compared. Only when both references are pointing to the same object does the method return true. If the properties of two objects are a perfect match but the references are different, the method returns false.
The Equals method can be overridden in a subclass. This permits the behaviour to be changed so that it is more appropriate. For example, in the case of the string data type, Equals is overridden so that a comparison of two strings can be made as though they were value types. Even when the two strings contain different references, if the underlying characters match, the method returns true.
string s1 = "Hello";string s2 = "Hello";bool result = s1.Equals(s2); // result = true |
The Equals method is available in two forms. The instance version is shown in the above example. In this case, the method requires a single parameter containing the item to be compared to the invoking object. A static version of the method is also available. This requires two parameters, one for each of the items to be compared. The above example could therefore be rewritten as:
string s1 = "Hello";string s2 = "Hello";bool result = string.Equals(s1, s2); // result = true |
When overriding the behaviour of the Equals method, there are several rules that must be followed to ensure correct operation. These are:
- A call to x.Equals(x), where “x” is a variable of the class in question, must return true. The only exception to this rule is in the comparison of floating point data, where you may decide that a variable containing NaN (not a number) is not equivalent to itself. NB: Interestingly, the floating point types in the .NET framework return true when comparing NaN to NaN using the Equals method, but false when using the == operator. The == operator matches theIEC 60559:1989 specification whilst the Equals method does not.
- A call to x.Equals(y) must return the same result as a call to y.Equals(x).
- The expression “x.Equals(y) && y.Equals(z)” must only return true if x.Equals(z) returns true.
- If x and y are not modified, successive calls to x.Equals(y) must return consistent results.
- A call to x.Equals(null) must return false.
- If the == operator is overloaded, the Equals method must be overridden to provide matching functionality, except in the case of floating point value types.
- If Equals is overridden, the GetHashCode method must also be overridden for compatibility. Otherwise,Hashtables may function incorrectly.
- If a class implements the IComparable interface, the Equals method should be overridden.
- The Equals method must not throw exceptions.
GetHashCode Method
The GetHashCode method provides an algorithm to generate a hash code for an object. Hash codes are used when creatinghash tables to permit objects to be found quickly in large sets of data. The GetHashCode method is used by the Hashtable collection class for this purpose.
The GetHashCode method returns an integer containing the hash code for an object. The value is not unique and should not be used as an identifier or for any purposes other than when using a hashing function. This is particularly relevant when using multiple versions of the .NET framework as the hashing algorithms for classes vary between versions, leading to different results for identical objects.
You can see examples of the return values by executing the following code. The results shown are generated using version 3.5 of the .NET framework and may differ from those you see.
int i = 10;float f = 10;string s = "Hello";int result;result = i.GetHashCode(); // result = 10result = f.GetHashCode(); // result = 1092616192result = s.GetHashCode(); // result = -694847 |
The GetHashCode method can be overridden. When doing so, the following guidelines should be followed:
- If GetHashCode is overridden, the Equals method must also be overridden for compatibility. Otherwise, Hashtables may function incorrectly.
- The value returned from the hashing algorithm must be appropriate for value types. Two values that would be considered equal when using the Equals method must return the same hash code.
- The hash codes generated by the algorithm should be well distributed amongst the available range of integer return values. If the algorithm produces many duplicates or similar values, the performance of Hashtables will be impacted.
- The hashing algorithm should be as fast and efficient as possible to avoid performance issues with Hashtables.
- The GetHashCode method must not throw exceptions.
GetType Method
The GetType method simply returns the type of the object that invokes it. This is useful when using polymorphismtechniques as the type of the underlying object can be identified, even if held in a variable declared as another type. For example, if “Dog” is a subclass of “Animal” and a Dog object is being held in an Animal variable, the type returned will still be Dog. The method is also used for reflection.
The type is returned in a System.Type object. A detailed description of the System.Type class is beyond the scope of this article. For demonstration purposes we will simply output a string representation of the type to the console.
string s = "Hello";Console.WriteLine(s.GetType()); // Outputs "System.String"object o = s;Console.WriteLine(o.GetType()); // Outputs "System.String" |
ReferenceEquals Method
The ReferenceEquals method is a static member of the Object class. It is used with reference types to determine if two instances of a class contain the same reference. If the references are the same, the method returns true. If the references are different, the method returns false, even if the values of the two instances match. If the two items to be compared are both null, the resultant value is true. If they are two value types, the result is always false.
The method is called with two parameters, each holding one of the references to be compared.
object o1 = new object();object o2 = new object();object o3 = o1;bool result;result = object.ReferenceEquals(o1, o2); // result = falseresult = object.ReferenceEquals(o1, o3); // result = trueint i1 = 1;int i2 = 1;result = object.ReferenceEquals(i1, i2); // result = false |
ToString Method
The ToString method is probably the most well-known and used member of the Object class. This method returns a human-readable, string representation of the current object. The default behaviour is to return the fully qualified name of the object’s type. However, this can be overridden to provide a more useful value, as in the case of thenumeric types where the ToString method is overridden and overloaded to allow the creation of formatted numeric strings.
The base version of ToString provided by the Object class accepts no parameters.
object o = new object();Console.WriteLine(o.ToString()); // Outputs "System.Object" |
Protected Methods
Finalize Method
The Finalize method is the first protected method of the Object class that we will consider. This method permits objects to clean up any resources and perform any other activities that are required before an object that is no longer required is reclaimed by the garbage collector. Finalizers in C# are declared as destructors.
The Finalize method cannot be overridden and may not be called during the normal execution of a program. The method is called automatically after an object is no longer accessible, due to all references to it being removed or going out of scope. However, there is no guarantee of the exact execution time of the Finalize method and certainly no assumption that it will run immediately should be made. It is also possible that the finalizer will not run at all if another Finalize method is blocked indefinitely or if the program terminates abnormally.
If two objects become inaccessible at the same time, there is no guarantee of the order in which their finalizers will be called. This is still the case when one of the objects refers to the other.
Classes must implement a destructor when they use unmanaged resources such as database connections or file handles. These resources cannot be reclaimed by the garbage collector and will otherwise not be correctly released. However, in these cases, the class should also implement the IDisposable interface.
MemberwiseClone Method
The MemberwiseClone method is used to create a shallow copy of an object. A shallow copy of an object contains the same values and references as the original. For value type members, this is a bitwise copy of the member data. For reference type members the reference only is copied, meaning that the copy and the original are references to the same object. The method is called with no parameters and returns the cloned object as a System.Object that may be cast to the correct type as required.
Association, Aggregation, Composition
en we have only one relationship between objects, that is called Association. Aggregation and Composition both are specialized form of Association. Composition is again specialize form of Aggregation.
Association is a relationship where all object have their own lifecycle and there is no owner. Let’s take an example of Teacher and Student. Multiple students can associate with single teacher and single student can associate with multiple teachers but there is no ownership between the objects and both have their own lifecycle. Both can create and delete independently.
Aggregation is a specialize form of Association where all object have their own lifecycle but there is ownership and child object can not belongs to another parent object. Let’s take an example of Department and teacher. A single teacher can not belongs to multiple departments, but if we delete the department teacher object will not destroy. We can think about “has-a” relationship.
Composition is again specialize form of Aggregation and we can call this as a “death” relationship. It is a strong type of Aggregation. Child object dose not have their lifecycle and if parent object deletes all child object will also be deleted. Let’s take again an example of relationship between House and rooms. House can contain multiple rooms there is no independent life of room and any room can not belongs to two different house if we delete the house room will automatically delete. Let’s take another example relationship between Questions and options. Single questions can have multiple options and option can not belong to multiple questions. If we delete questions options will automatically delete.
Difference between String and StringBuffer/StringBuilder
Well, the most important difference between String and StringBuffer/StringBuilder is that String object is immutable whereas StringBuffer/StringBuilder objects are mutable.
By immutable, we mean that the value stored in the String object cannot be changed. Then the next question that comes to our mind is “If String is immutable then how am I able to change the contents of the object whenever I wish to?” . Well, to be precise it’s not the same String object that reflects the changes you do. Internally a new String object is created to do the changes.
So suppose you declare a String object:
String myString = “Hello”;
Next, you want to append “Guest” to the same String. What do you do?
myString = myString + ” Guest”;
When you print the contents of myString the output will be “Hello Guest”. Although we made use of the same object(myString), internally a new object was created in the process. So, if you were to do some string operation involving an append or trim or some other method call to modify your string object, you would really be creating those many new objects of class String.
Now isn’t that a performance issue?
Yes, it definitely is.
Then how do you make your string operations efficient?
By using StringBuffer or StringBuilder.
How would that help?
Well, since StringBuffer/StringBuilder objects are mutable, we can make changes to the value stored in the object. What this effectively means is that string operations such as append would be more efficient if performed using StringBuffer/StringBuilder objects than String objects.
Finally, whats the difference between StringBuffer and StringBuilder?
StringBuffer and StringBuilder have the same methods with one difference and that’s of synchronization. StringBuffer is synchronized( which means it is thread safe and hence you can use it when you implement threads for your methods) whereas StringBuilder is not synchronized( which implies it isn’t thread safe).
So, if you aren’t going to use threading then use the StringBuilder class as it’ll be more efficient than StringBuffer due to the absence ofsynchronization.
Lock, Monitor, Mutex, Semaphore
Locking
Exclusive locking is used to ensure that only one thread can enter particular sections of code at a time. The two main exclusive locking constructs are lock and Mutex. Of the two, the lock construct is faster and more convenient.Mutex, though, has a niche in that its lock can span applications in different processes on the computer.
Let’s start with the following class:
class ThreadUnsafe
{
  static int _val1 = 1, _val2 = 1;

  static void Go()
  {
    if (_val2 != 0) Console.WriteLine (_val1 / _val2);
    _val2 = 0;
  }
}
This class is not thread-safe: if Go was called by two threads simultaneously, it would be possible to get a division-by-zero error, because _val2 could be set to zero in one thread right as the other thread was in between executing the if statement and Console.WriteLine.
Here’s how lock can fix the problem:
class ThreadSafe
{
  static readonly object _locker = new object();
  static int _val1, _val2;

  static void Go()
  {
    lock (_locker)
    {
      if (_val2 != 0) Console.WriteLine (_val1 / _val2);
      _val2 = 0;
    }
  }
}
Only one thread can lock the synchronizing object (in this case, _locker) at a time, and any contending threads areblocked until the lock is released. If more than one thread contends the lock, they are queued on a “ready queue” and granted the lock on a first-come, first-served basis (a caveat is that nuances in the behavior of Windows and the CLR mean that the fairness of the queue can sometimes be violated). Exclusive locks are sometimes said to enforceserialized access to whatever’s protected by the lock, because one thread’s access cannot overlap with that of another. In this case, we’re protecting the logic inside the Go method, as well as the fields _val1 and _val2.
Monitor.Enter and Monitor.Exit
C#’s lock statement is in fact a syntactic shortcut for a call to the methods Monitor.Enter and Monitor.Exit, with atry/finally block. Here’s (a simplified version of) what’s actually happening within the Go method of the preceding example:
Monitor.Enter (_locker);
try
{
  if (_val2 != 0) Console.WriteLine (_val1 / _val2);
  _val2 = 0;
}
finally { Monitor.Exit (_locker); }
Calling Monitor.Exit without first calling Monitor.Enter on the same object throws an exception.
Mutex
A Mutex is like a C# lock, but it can work across multiple processes. In other words, Mutex can be computer-wideas well as application-wide.
Acquiring and releasing an uncontended Mutex takes a few microseconds — about 50 times slower than a lock.
With a Mutex class, you call the WaitOne method to lock and ReleaseMutex to unlock. Closing or disposing aMutex automatically releases it. Just as with the lock statement, a Mutex can be released only from the same thread that obtained it.
A common use for a cross-process Mutex is to ensure that only one instance of a program can run at a time. Here’s how it’s done:
class OneAtATimePlease
{
  static void Main()
  {
    // Naming a Mutex makes it available computer-wide. Use a name that's
    // unique to your company and application (e.g., include your URL).

    using (var mutex = new Mutex (false, "oreilly.com OneAtATimeDemo"))
    {
      // Wait a few seconds if contended, in case another instance
      // of the program is still in the process of shutting down.

      if (!mutex.WaitOne (TimeSpan.FromSeconds (3), false))
      {
        Console.WriteLine ("Another app instance is running. Bye!");
        return;
      }
      RunProgram();
    }
  }

  static void RunProgram()
  {
    Console.WriteLine ("Running. Press Enter to exit");
    Console.ReadLine();
  }
}
If running under Terminal Services, a computer-wide Mutex is ordinarily visible only to applications in the same terminal server session. To make it visible to all terminal server sessions, prefix its name with Global\.
Semaphore
A semaphore is like a nightclub: it has a certain capacity, enforced by a bouncer. Once it’s full, no more people can enter, and a queue builds up outside. Then, for each person that leaves, one person enters from the head of the queue. The constructor requires a minimum of two arguments: the number of places currently available in the nightclub and the club’s total capacity.
A semaphore with a capacity of one is similar to a Mutex or lock, except that the semaphore has no “owner” — it’sthread-agnostic. Any thread can call Release on a Semaphore, whereas with Mutex and lock, only the thread that obtained the lock can release it.
There are two functionally similar versions of this class: Semaphore and SemaphoreSlim. The latter was introduced in Framework 4.0 and has been optimized to meet the low-latency demands of parallel programming. It’s also useful in traditional multithreading because it lets you specify acancellation token when waiting. It cannot, however, be used for interprocess signaling.
Semaphore incurs about 1 microsecond in calling WaitOne or Release; SemaphoreSlim incurs about a quarter of that.
Semaphores can be useful in limiting concurrency — preventing too many threads from executing a particular piece of code at once. In the following example, five threads try to enter a nightclub that allows only three threads in at once:
class TheClub      // No door lists!
{
  static SemaphoreSlim _sem = new SemaphoreSlim (3);    // Capacity of 3

  static void Main()
  {
    for (int i = 1; i <= 5; i++) new Thread (Enter).Start (i);
  }

  static void Enter (object id)
  {
    Console.WriteLine (id + " wants to enter");
    _sem.Wait();
    Console.WriteLine (id + " is in!");           // Only three threads
    Thread.Sleep (1000 * (int) id);               // can be here at
    Console.WriteLine (id + " is leaving");       // a time.
    _sem.Release();
  }
}

1 wants to enter
1 is in!
2 wants to enter
2 is in!
3 wants to enter
3 is in!
4 wants to enter
5 wants to enter
1 is leaving
4 is in!
2 is leaving
5 is in!
If the Sleep statement was instead performing intensive disk I/O, the Semaphore would improve overall performance by limiting excessive concurrent hard-drive activity.
A Semaphore, if named, can span processes in the same way as a Mutex.
ThreadPool
A thread pool takes away all the need to manage your threads – all you have to do is essentially say “hey! someone should go do this work!”, and a thread in the process’ thread pool will pick up the task and go execute it. And that is all there is to it. Granted, you still have to keep threads from stepping on each other’s toes, and you probably care about when these ‘work items’ are completed – but it is at least a really easy way to queue up a work item.
In fact, working with the ThreadPool is so easy, I’m going to throw all the code at you at once. Below is a pretty simple test app that gives 5 (or NumThreads) work items to the ThreadPool, waits for them all to complete, and then prints out all the answers. I will walk through the code step by step below:
using System.Threading;namespace ThreadPoolTest
{
class Program
{
private const int NumThreads = 5;
private static int[] inputArray;
private static double[] resultArray;
private static ManualResetEvent[] resetEvents;
private static void Main(string[] args)
{
inputArray = new int[NumThreads];
resultArray = new double[NumThreads];
resetEvents = new ManualResetEvent[NumThreads];
Random rand = new Random();
for (int s = 0; s < NumThreads; s++)
{
inputArray[s] = rand.Next(1,5000000);
resetEvents[s] = new ManualResetEvent(false);
ThreadPool.QueueUserWorkItem(new WaitCallback(DoWork), (object)s);
}
Console.WriteLine(“Waiting…”);
WaitHandle.WaitAll(resetEvents);
Console.WriteLine(“And the answers are: “);
for (int i = 0; i < NumThreads; i++)
Console.WriteLine(inputArray[i] + ” -> ” + resultArray[i]);
}
private static void DoWork(object o)
{
int index = (int)o;
for (int i = 1; i < inputArray[index]; i++)
resultArray[index] += 1.0 / (i * (i + 1));
resetEvents[index].Set();
}
}
}
We have three arrays at the top of the program: one for input to the work items (inputArray), one for the results (resultArray), and one for the ManualResetEvents (resetEvents). The first two are self explanatory, but what is aManualResetEvent? Well, it is an object that allows one thread to signal another thread when something happens. In the case of this code, we use these events to signal the main thread that a work item has been completed.
So we initialize these arrays, and then we get to a for loop, which is where we will be pushing out these work items. First, we make a random value for the initial input (cause random stuff is always more fun!), then we create aManualResetEvent with its signaled state initially set to false, and then we queue the work item. Thats right, all you have to do to push a work item out for the ThreadPool to do is call ThreadPool.QueueUserWorkItem.
So what are we queuing here? Well, we are saying that a thread in the thread pool should run the method DoWork, with the argument s. Any method that you want to queue up for the thread pool to run needs to take one argument, an object, and return void. The argument will end up being whatever you passed in as the second argument to theQueueUserWorkItem call – and in this case is the ‘index’ of this work item (the index in the various arrays that it needs to work with). And it makes sense that the method would have to return void – because it isn’t actually returning ‘to’ anything, it is running out there all on its own as a separate thread.
So what are we doing in this DoWork function? Not that much in this case, just a simple summation. The important part is the very last call of the function, which is hit when all the work for this work item is done –resetEvents[index].Set(). This triggers the ManualResetEvent for this work item – signaling the main thread that the work is all done here.
Back up in main thread land, after it has pushed all these work items onto the ThreadPool queue, we hit the very important call WaitHandle.WaitAll(resetEvents). This causes the main thread to block here until all theManualResetEvent objects in the resetEvents array signal. When all of them have signaled, that means that all the work units have been completed, and so we continue on and print out all the results. The results change because we are seeding with random values, but here is one example output:
And the answers are:
3780591 -> 0.991001809831479
3555614 -> 0.991163782231558
2072717 -> 0.989816715560308
2264396 -> 0.989982111762391
544144 -> 0.99066981542858
Pretty simple, eh? There are a couple things to note, though. The default thread pool size for a process is 25 threads, and while you can change this number, this resource is not infinite. If all of the threads in the pool are currently occupied with other tasks, new work items will be queued up, but they won’t get worked on until one of the occupied threads finishes its current task. This generally isn’t a problem unless you are giving the pool very large quantities of work. And really, you should never assume that a task is executed immediately after you queue it, because there is no guarantee of that at all.
That’s it for this intro to thread pools in C#. If there are any questions, leave them below – especially if they push on the more advanced aspects of threads and thread pools (cause then I’ll have an excuse to write some more threading tutorials!).
EventWaitHandler: AutoResetEvent vs. ManualResetEvent
WaitHandler
Threads can communicate using WaitHandlers by signaling. Mutex, Semapore and EventWaitHandle are derived from WaitHandle class.
EventWaitHandle
There are two types of EventWaitHandlers. AutoResetEvent and ManualResetEvent. AutoResetEvent lets one waiting thread at a time when Set() is called but ManualResetEvent lets all waiting threads to pass by when Set() is called. ManualResetEvent starts blocking when Reset() is called.
AutoResetEvent
This acts like a turnstile which lets one at a time. When a thread hits WaitOne(), it waits till some other thread calls Set(). Take a look at the following picture. Thread1, Thread2 and Thread3 are waiting after calling WaitOne(). For every Set() call from another thread, one thread will pass the turnstile.

I have created a simple application to test this. There are two buttons to span a thread DoWork. DoWork has WaitOne call and it blocks threads. Third button calls Set() to release one thread at a time. Click first two buttons to span thread and click third button twice to release blocked threads.
private EventWaitHandle wh = new AutoResetEvent(false);
private void DoWork()
{
    Console.WriteLine(Thread.CurrentThread.Name + ": Waiting for Set() notification");
    // Wait for notification
    //
    wh.WaitOne();
    Console.WriteLine(Thread.CurrentThread.Name + ": Notified");
}
private void buttonCreateThreadOne_Click(object sender, EventArgs e)
{
    Thread a = new Thread(DoWork);
    // You can name the thread!.. for debugging purpose
    a.Name = "A";
    a.Start();
}
private void buttonCreateSecondThread_Click(object sender, EventArgs e)
{
    Thread b = new Thread(DoWork);
    // You can name the thread!.. for debugging purpose
    b.Name = "B";
    b.Start();
}
private void buttonReleaseOneThread_Click(object sender, EventArgs e)
{
    wh.Set();
}
Please note that the code after WaitOne call in DoWork is not thread safe. A call to Set will let next waiting thread to enter even the first thread is still executing the code.
ManualResetEvent
This is like a gate which lets more than one at a time. When a thread hits WaitOne(), it waits till someother thread calls Set(). Take a look at the following picture. Thread1, Thread2 and Thread3 are waiting after calling WaitOne(). When Set is called from another thread, all waiting thereads will pass the gate.

Code snippet to illustrate the above.
private void buttonFirstThread_Click(object sender, EventArgs e)
{
    Thread a = new Thread(DoWork);
    // You can name the thread!.. for debugging purpose
    a.Name = "A";
    a.Start();
}
private void buttonSecondThread_Click(object sender, EventArgs e)
{
    Thread b = new Thread(DoWork);
    // You can name the thread!.. for debugging purpose
    b.Name = "B";
    b.Start();
}
private void buttonCallSet_Click(object sender, EventArgs e)
{
    wh.Set();
}
private void buttonCallReset_Click(object sender, EventArgs e)
{
    wh.Reset();
}
Inversion Of Control(IOC) or Dependency Injection(DI)?
In designing an object-oriented application, a major tenet of design is “loose coupling”. Loosely, not meant for the pun, “loose coupling” means that objects should only have as many dependencies as is needed to do their job – and the dependencies should be few. Furthermore, an object’s dependencies should be on interfaces and not on “concrete” objects, when possible. (A concrete object is any object created with the keyword new.) Loose coupling promotes greater reusability, easier maintainability, and allows you to easily provide “mock” objects in place of expensive services, such as a socket-communicator. “Dependency Injection” (DI), also more cryptically known as “Inversion of Control” (IoC), can be used as a technique for encouraging this loose coupling. There are two primary approaches to implementing DI: constructor injection and setter injection. Obviously, at some point, something must be responsible for creating the concrete objects that will be injected into another object. The injector can be a parent object, which I’ll call the “DI controller”, or can be externalized and handled by a “DI container” framework. What follows is a brief overview of the various approaches for using dependency injection techniques.
Constructor Injection
Constructor Injection is the DI technique of passing an object’s dependencies to its constructor. The below example includes a class, Customer, that exposes a method for retrieving every sales-order that the customer made on a particular date. Consequently, the Customer class needs a data-access object for communicating with the database. Assume, an OrderDao (“order data-access object”) exists which implements the interface IOrderDao. One way that a Customer object can get this dependency is by executing the following within the: IOrderDao orderDao = new OrderDao();. The primary disadvantage of this is two-fold:
1. the benefit of having the interface in the first place has been negated since the concrete instance was created locally, and
2. OrderDao cannot easily be replaced by a mock object for testing purposes. (Mock objects will be discussed shortly.)
The aforementioned example follows:
public class Customer {
public Customer(IOrderDao orderDao) {
if (orderDao == null)
throw new ArgumentNullException(“orderDao may not be null”);
this.orderDao = orderDao;
}
public IList GetOrdersPlacedOn(DateTime date) {
// … code that uses the orderDao member
// get orders from the datasource …
}
private IOrderDao orderDao;
}
In the example, note that the constructor accepts an interface; it does not accept a concrete object. Also, note that an exception is thrown if the orderDao parameter is null. This emphasizes the importance of receiving a valid dependency. Constructor Injection is, in my opinion, the preferred mechanism for giving an object its dependencies. It is clear to the developer invoking the object which dependencies need to be given to the Customer object for proper execution. But consider the following example… Suppose you have a class with ten methods that have no dependencies, but you’re adding a new method that does have a dependency on IOrderDao. You could change the constructor to use Constructor Injection, but this may force you to change constructor calls all over the place. Alternatively, you could just add a new constructor that takes the dependency, but then how does a developer easily know when to use one constructor over the other. Finally, if the dependency is very expensive to create, why should it be created and passed to the constructor when it may only be used rarely? “Setter Injection” is another DI technique that can be used in situations such as this.
Setter Injection
Setter Injection does not force dependencies to be passed to the constructor. Instead, the dependencies are set onto public properties exposed by the object in need. As implied previously, the primary motivators for doing this include:
1. supporting dependency injection without having to modify the constructor of a legacy class, and
2. allowing expensive resources or services to be created as late as possible and only when needed.
The code below modifies the Constructor Injection example to use
Setter Injection instead:
public class Customer {
public Customer() {}
public IOrderDao OrderDao {
set { orderDao = value; }
get {
if (orderDao == null)
throw new MemberAccessException(“orderDao” +
” has not been initialized”);
return orderDao;
}
}
public IList GetOrdersPlacedOn(DateTime date) {
//… code that uses the OrderDao public
//… property to get orders from the datasource …
}
// Should not be called directly;
// use the public property instead
private IOrderDao orderDao;
}
In the above example, the constructor accepts no arguments. Instead, the invoking object is responsible for setting the IOrderDao dependency before the method GetOrdersPlacedOn is called. With Constructor Injection, an exception is thrown if the dependency is not set immediately, i.e., upon creation. With Setter Injection, an exception isn’t thrown until a method actually attempts to use the dependency. Make note of the fact that GetOrdersPlacedOn uses the public OrderDao property; it does not call the private orderDao directly. This is so that the getter method has an opportunity to validate if the dependency has yet been initialized. Setter Injection should be used sparingly in place of Constructor Injection, because it:
1. does not make it clear to the developer which dependencies are needed when, at least until a “has not been initialized” exception is thrown, and
2. makes it a bit more difficult to track down where the exception came from and why it got thrown. With this said, Setter Injection can save on modifying a lot of legacy code when introducing new methods, and can provide a performance boost if the dependency is expensive or not easily accessible.
The Injectors
The next logical question is, what actually creates the dependencies that are to be injected into “injectees”? There are two appropriate places for adding creation logic: controllers and containers.
DI Controllers
The “DI controller” approach is the simpler to understand and implement. In a properly tiered architecture, an application has distinct layers for handling logic. The simplest layering usually consists of a data-layer for talking to the database, a presentation-layer for displaying the UI, and a domain-logic layer for performing business logic. A “controller” layer always exists, even if not well defined, for coordinating UI events to the domain and data layers, and vice versa. For example, in ASP.NET, the code-behind page acts as a rudimentary controller layer. More formalized controller-layer approaches exist: Struts and Spring for Java; Front Controller and Spring .NET for .NET. All of these approaches follow some form of variant of the Model-View-Controller pattern. Regardless of what you use as your controller, the controller is an appropriate location for performing Dependency Injection “wiring”. This is where concrete objects are created and injected as dependencies. What follows are two examples of DI performed by a controller. The first is an illustrative example of “production code” – code that you’d end up deploying. The second is an example of “test code” – code that’s used to test the application, but is not deployed and does not have the need to have a live database. Controller code performing the dependency injection (e.g., from an ASP.NET code-behind page):
//… code performed when the controller is loaded …
IOrderDao orderDao = new OrderDao();
// Using Setter Injection on a pre-existing customer
someCustomer.OrderDao = orderDao;
IList ordersPlacedToday =
someCustomer.GetOrdersPlacedOn(DateTime.Now);
…
Unit-test code performing dependency injection:
IOrderDao orderDao = new MockOrderDao();
// Using Setter Injection on a pre-existing customer
someCustomer.OrderDao = orderDao;
IList ordersPlacedToday =
someCustomer.GetOrdersPlacedOn(DateTime.Now);
One of the major benefits of using a DI-controller to inject dependencies is that it’s straightforward and easy to point to where the creation is occurring. The drawback to using DI-controllers is that the dependencies are still hard-coded somewhere; albeit, they’re hard-coded in a location that is often subject to frequent changes anyway. Another drawback is that now the DI-controllers themselves can’t be easily unit-tested with mock objects. (Granted, a powerful tool such as TypeMock can do just about anything when it comes to injecting mock objects. But a tool such as TypeMock should be used only when absolutely necessary as it can lead to habits of not programming-to-interface. In fact, I’d recommend only considering the use of it on very difficult to test, legacy applications.) In ASP.NET, I prefer to use the Model-View-Presenter (MVP) pattern, and have the ASP.NET code-behind page create dependencies and inject them to the presenter via Construction Injection. Additionally, I use UserControls as the View part of the pattern, so the ASP.NET code-behind acts purely as an MVP “dependency initializer” between the UserControls (View) and their presenters. Another option to implementing constructor or setter DI is the use of an application container…
DI Containers
Inversion-of-Control/Dependency-Injection “containers” can be used to watch an application and inject dependencies whenever a particular event occurs. For example, whenever a Customer instance is created, it automatically gets injected with its needed dependencies. It’s a strange concept at first, but can be useful for managing large applications with many service dependencies. Different container providers each have their own mechanism for managing dependency injection settings.
A very good example can be found at :
http://www.codeproject.com/Articles/26466/Dependency-Injection-using-Spring-NET/
http://www.youtube.com/watch?v=Jjp_EYEn4bc&feature=related
http://www.youtube.com/watch?v=IOZzxmJVus0&feature=relmfu
http://joelabrahamsson.com/entry/inversion-of-control-introduction-with-examples-in-dotnet
Singleton Class
using System;

public sealed class Singleton
{
   private static volatile Singleton instance;
   private static object syncRoot = new Object();

   private Singleton() {}

   public static Singleton Instance
   {
      get
      {
         if (instance == null)
         {
            lock (syncRoot)
            {
               if (instance == null)
                  instance = new Singleton();
            }
         }

         return instance;
      }
   }
}
This approach ensures that only one instance is created and only when the instance is needed. Also, the variable is declared to be volatile to ensure that assignment to the instance variable completes before the instance variable can be accessed. Lastly, this approach uses a syncRoot instance to lock on, rather than locking on the type itself, to avoid deadlocks.
This double-check locking approach solves the thread concurrency problems while avoiding an exclusive lock in every call to the Instance property method. It also allows you to delay instantiation until the object is first accessed.
Real World Example of a Singleton Class
Thread pools, SQL Connection Pools, Registry objects, Objects handling user preferences, Caches, Factory classes, Builder classes and Statistics utilities like a hit counter, log4net, when you call its logger, it uses a singleton class to return it.
Difference between Singleton and Static Class
Another question that usually comes up when it comes to using a Singleton is “Why not just use a static class?”. Static classes still have many uses and lots of times, people get confused and will use a Singleton as much as possible. One easy rule of thumb you can follow is if it doesn’t need to maintain state, you can use a Static class, otherwise you should use a Singleton.
So here is a quick list of uses for static classes:
Math.pow(double a, double b);
Interger.parseInt(String s);
Interger.toString(int i);
As you can see, the state of these methods don’t matter. You just want to use them to perform a simple task for you. But if you coding your application and you are using a central object where state does matter(such as the ModelLocator example), then its best to use a Singleton.
The next reason you may want to use a Singleton is if it is a particularly “heavy” object. If your object is large and takes up a reasonable amount of memory, you probably only one of those objects floating around. This is the case for things like a if you have a factory method that is particularly robust, you want to make sure that its not going to be instantiated multiple times. A Singleton class will help prevent such the case ever happening.
Thread Management
Download MultiThreading in .NET 2.0
Why Threads?
Some years ago I saw a letter-to-the-editor in response to the need of a multitasking system, the writer said “I don’t care about multitasking because I can only do one thing at a time.” Really? Does this person only do one thing at a time? This person continues with “I finish my Word document, print it, fire up my modem to connect to the Internet, read my e-mail, and go back to work on another document.” Does this person efficiently use his time? Many of us might suggest that this person could fire up his modem while the printer is printing, or work on another document while the previous one is being printed. Good suggestions, indeed. In fact, we are multitasking many tasks in our daily life. For example, you might watch your favorite TV program or movie and enjoy your popcorn. Or, while you are printing a long document, you might read a newspaper or company news. There are so many such examples demonstrating that we are doing two or more tasks simultaneously. This is a form of multitasking! In fact, multitasking is more common in industry. While each worker of an assembly line seems working in a sequential way, there could be multiple production lines, all of which perform the same task concurrently. Moreover, the engine assembly lines produce engines while the other lines produce other components. Of course, the car assembly lines run concurrently with all of the other lines. The final product is the result of these concurrently running assembly/production lines. Without this type of “parallelism” Detroit would not be able to produce sufficient airplanes and tanks for WW II and enough number of automobiles to fulfill our demand.
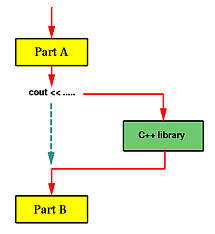
Unfortunately, before you learn how to split your program into multiple execution threads, all programs you wrote contain a single execution thread. The following diagram shows an example. Suppose we have a program of two parts, Part A and Part B. After Part A finishes its computation, we use some cout statements to print out a large amount of output. As we all know, when a program prints, the control is transfered to a function in C++’s library and the execution of that program is essentially suspended, shown in dashed line in the diagram, until the printing completes. Once this (i.e., printing) is done, the execution of the program resumes and starts the computation of Part B. Is there anything wrong with this? No, we are used to it and we are trained to do programming in this way ever since CS101. However, is this way of programming good enough in terms of efficiency? It depends; but, in many situations, it is not good enough.
If Part B must use some data generated by Part A, then Part B perhaps has to be executed after the output of cout completes. On the other hand, in many situations, Part A and Part B are independent of each other, or one may slightly rewrite both parts so that they do not depend on each other. In this case, Part B does not have to wait until cout completes. In fact, this is the key point! Therefore, before the execution of Part A, the program can be split into two execution threads, one for Part A and the other for Part B. See the diagram below. In this way, both execution threads share the CPU and all resources allocated to the program. Moreover, while Part A is performing the output which causes Part A to wait, Part B can take the CPU and executes. As a result, this version is more efficient than the previous one. Moreover, in a system with more than one CPUs, it is possible that the system will run both Part A and Part B at the same time, one on each CPU.

In real programming practice, a program may use an execution thread for handling keyboard/mouse input, a second execution thread for handling screen updates, and a number of other threads for carrying out various computation tasks.
Example: Quicksort
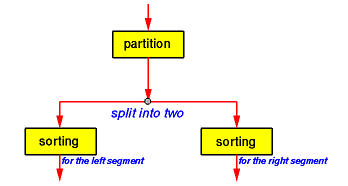
The quicksort algorithm consists of two steps in each recursion. First, the partition step divides the input array segment into two segments such that all elements in the left segment is smaller or equal to all elements in the right segment. Second, the sorting step simply sorts the left segment and the right segment. After these two steps complete, the input segment is sorted. While it is not so obvious if the partition step can have multiple execution threads, one can split the execution of the sorting step into two, one for sorting the left segment while the other for sorting the right one. This is shown in the diagram below:
Example: Merging
Consider another simple problem. Suppose we have two arrays a[ ] and b[ ] of n elements each. For simplicity, we assume that all of these 2n elements are different. Our job is to merge these two arrays into a sorted one. Everyone who took a data structures course knows how to do it; however, let us look at the same problem from a different angle.
Take an element from array a, say a[i]. We know that it is larger than i-1 elements of a. If we can figure out how many elements of b that are smaller than a[i], we will be able to know the exact location of a[i] in the sorted array. This is illustrated in the following diagram:
 With a slightly modified binary search, we can easily determine the location of a[i] in array b. There are only three possibilities:
- a[i] is less than b[0]: In this case, a[i] is larger than i-1 elements in a and smaller than all elements in b. Therefore, a[i] should be in position i of the sorted array.
- a[i] is larger than b[n]: In this case, a[i] is larger than i-1 elements in a and n elements in b. Therefore, a[i] should be in position i+n of the sorted array.
- a[i] is between b[k-1] and a[k]. In this case, a[i] is larger than i-1 elements in a and k-1 elements in b. Therefore, a[i] should be in position i+k-1 of the sorted array.
After the main program reads in both arrays, it can split itself into 2n execution threads, each of which handles an element in a or in b. Each of these execution threads determines its position in the merged array and writes the values into the corresponding location. After this, we will have a merged array! Thus, we use 2n threads, each of which takes O(log2(n)) comparisons to get the job done. In the conventional serial case, we use one execution thread which uses O(n) comparisons to merge the arrays.
Example: Matrix Multiplication
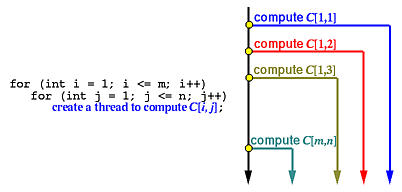
Another interesting application is the multiplication of two matrices. Suppose we have two matrices Am×k (m rows and k columns) and Bk×n (k rows and n columns) and want to compute the product of A and B into a matrix C of m rows and n columns. The entry of C on row i and column j is the sum of the products of the corresponding elements on row i of matrix A and column j of matrix B as shown below:
 How can we use multiple execution threads to solve this problem? We notice that the computation of Ci,j is independent of the computation of any other entries of matrix C. Because of this, after matrices A and B are read in, the main program can split m×n execution threads, one for each entry of matrix C. Each of these execution threads computes the products of the corresponding elements, sums them up, and stores the result into matrixC.
It requires k multiplications to compute a single entry of matrix C. Since there are m×n entries in C, the program with only one thread uses m×n×k multiplications. On the other hand, in the above scheme, each thread uses kmultiplications and there are m×n threads. If we have only one CPU, the multiple execution threads version may not be as efficient as the single execution thread one; however, if there are more than one CPUs, each of these CPUs may be assigned to a number of execution threads and the execution efficiency is higher. In the extreme case in which we have m×n CPUs to use, because all execution threads run at the same time, it only takes the time to compute one entry to complete the whole matrix multiplication. Thus, it is m×n times more efficient than the single execution thread version.

By now, you perhaps have had a good feeling of why splitting a program into multiple execution threads may increase the execution efficiency. However, just like in the movie Multiplicity, creating too many execution threads may lead to a chaotic situation because in addition to splitting a program into multiple execution threads these threads must communicate with each other properly in order to work together. Thus, in addition to learning the way of creating execution threads, we also have to learn the way of managing threads and the way of thread synchronization.
The above examples may look a little unrealistic and their benefits seem only about program efficiency. There are other benefits of using multiple execution threads.
There are four basic thread management operations: thread creation, thread termination, thread join, and thread yield.
Thread Creation
We have discussed the creation of threads in a above page. Basically, we can split the execution thread into two. After this, both threads execute concurrently. The creating thread is the parent thread, and the created thread is a child thread. Note that any thread, including the main program which is run as a thread when it starts, can create child threads at any time. In the following diagram, Thread A runs initially. Sometime later, it creates Thread B as indicated by a yellow dot. After this creation, Thread A and Thread B runs concurrently. Later on, Thread A may create one more thread Thread C. After Thread C is created, there are three threads running concurrently, all of which compete to use the CPUs. However, which thread is run at a particular time is not known to any one of them. The quicksort example discussed on a above page employs this scheme, where Thread A receives an array segment, partitions it into two segments, creates Thread B to sort the left segment, and then creates Thread C to sort the right one. Or, after the given array segment is partitioned into two, Thread A creates Thread B to sort the left segment and sorts the right segment by itself. In this way, two threads, one parent – Thread A – and one child – Thread B – would be sufficient.

In the matrix multiplication example, the main thread (i.e., the main program) must create a number of threads, one for each entry of the resulting matrix. A possibility is shown below. Two for statements are used to create m×n threads. We shall see more examples that dynamically create threads later.
Thread Termination
For most of the cases, threads are not created and run forever. After finish their work, threads terminate. In the quicksort example, after both array subsegments are sorted, the threads created for sorting them terminate. In fact, the thread that creates these two child threads terminates too, because its assigned task completes. In the merging example, the threads created to determine the position of array elements a[i] and b[j] in the merged array terminate once the final positions are computed. Similarly, in the matrix multiplication example, once the value of C[i,j] is computed, the corresponding thread terminates. In general, when the assigned task of a thread completes, the thread may be terminated.
Moreover, if the parent thread terminates, all of its child threads terminate as well. Why is this important? We briefly mentioned in a above page that the child threads share resources with the parent thread, including variables. When the parent thread terminates, all of its variables are gone, and, as a result, the child threads will not be able to access to those resources that the parent thread owns. Thus, if the parent thread runs faster and terminates earlier than its child threads do, we have a problem! This is why we need the third thread management feature: thread join.
Thread Join
Imagine the following scenario. You are preparing for tomorrow’s final examine and feel a little hungry. So, you give your younger brother ten bucks and ask him to buy a pizza for you. In this case, you are the main thread and your brother is a child thread. Once your order is given, both you and your brother are doing their job concurrently (i.e., studying and buying a pizza). Now, we have two cases to consider. First, your brother brings your pizza back and terminates while you are studying. In this case, you can stop studying and enjoy the pizza. Second, you finish your study early and sleep (i.e., your assigned job for today – study for tomorrow’s final exam – is done) before the pizza is available. Of course, you cannot sleep; otherwise, you won’t have a chance to eat the pizza. What you are going to do is to wait until your brother brings the pizza back. This is exactly the problem and solution we mentioned at the end of the previous section.
Thread join is designed to solve this problem. A thread can execute a thread join to wait until the other thread terminates. In our case, you – the main thread – should execute a thread join waiting for your brother – a child thread – to terminate. In general, thread join is for a parent to join with one of its child threads. Thread join has the following activities, assuming that a parent thread P wants to join with one of its child threads C.
- When P executes a thread join in order to join with C, which is still running, P is suspended until C terminates. Once C terminates, P resumes.
- When P executes a thread join and C has already terminated, P continues as if no such thread join has ever executed (i.e., join has no effect).
A parent thread may join with many child threads created by the parent. Or, a parent only join with some of its child threads, and ignore other child threads. In this case, those child threads that are ignored by the parent will be terminated when the parent terminates.
Thread Yield
Suppose you run a number of programs at the same time on a computer. It is possible that some CPU hogs keep eating up the CPU cycles so that other programs may hardly run. Well, this may be a problem of the scheduling policy of the operating system. However, when we write our programs with multiple threads, we have to make sure that some threads will not occupy the CPU forever, or for a very long time, without relinquishing it. Otherwise, we will end up in the situation where one or two threads keep running while the others simply wait there for their turns. That is, we run our threads in a very “polite” way that once a while a thread takes some rest so that the CPU can be used by other threads. This is achieved by thread yield.
When a thread executes a thread yield, the executing thread is suspended and the CPU is given to some other runnable thread. This thread will wait until the CPU becomes available again. Technically, in process scheduler’s terminology, the executing thread is put back into the ready queue of the processor and waits for its next turn. The following shows an example, where a small circle indicates the execution of a thread yield, a small square means the control is transferred back, a solid arrow indicates thread execution, and a dashed line segment depicts a thread waiting for execution. Suppose we have three threads A, B and C. Initially, A is running and executes a thread yield sometime later. This causes A is suspended temporarily and the CPU is given to the next thread, say B. Then, B runs for a while and executes a thread yield. Because there are two threads that are ready to run, A and C, the thread system picks one to run. Suppose it is C. When C executes a thread join, the control may switch back to A or B; however, the diagram shows the control is given back to A. In this way, threads execute in a cooperative way.

Thread Suspend and Resume
Thread suspend and resume are two more thread management features. When a thread executes a thread suspend to suspend the execution of itself or another thread, the indicated thread will be suspended until the execution of a thread resume that releases the indicated thread. For example, suppose we have three threads A, B and C running concurrently. Then, thread A execute a thread suspend to suspend the execution of threadB. After this, we have only two threads A and C running concurrently. Note that even though both A and C are waiting for the completion of their own I/O activities and no thread is running, the suspended thread B cannot run. To run thread B again, one of the other threads must execution a corresponding thread resume. For example, thread C may execute a thread resume to resume thread B‘s execution. After this, all three threads are running concurrently.
Both thread yield and thread suspend cause the execution of a thread to be suspended. What is the difference? The difference is a big one! With thread yield, the yielding thread is put back to the ready queue and will run when its turn comes. Thus, a yielding thread is runnable if the CPU becomes free in the future, although it is suspended. With a thread suspend, the suspended thread is not in the ready queue, and, as a result, the scheduler will not be able to pick it up and let it run when the CPU becomes free. Instead, the execution of a suspended thread can be resumed only by a specific thread resume call.
Thread suspend/resume can be very useful. For example, suppose a program must handle five different tasks. The main program may create five threads, one for each task. Initially, all threads are suspended by the main program. Once a task comes, the main program just resumes the corresponding thread. After handling the task, the thread simply suspends itself. This may be more efficient that creating a new thread to handle the task and then terminating the thread. However, thread suspend and resume could post some problem. Suppose a thread acquire a lock so that it becomes the only thread that can access to a shared resource. If before the thread releases the lock, it is suspended by another thread. Should this happen, no other thread can access the shared resource until a thread resume the suspended thread for it to release the lock. Because of this potential problem, which may lead to a system deadlock, the use of thread suspend and resume is usually not recommended. Some systems such as the Pthread do not support thread suspend and resume.
What is difference between Daemon and Non Daemon Thread
In java we have two type of Threads :
Daemon Thread and User Threads. Generally all threads created by programmer are user thread (unless you specify it to be daemon or your parent thread is a daemon thread). User thread are generally meant to run our programm code. JVM doesn’t terminates unless all the user thread terminate.
On the other hand we have Daemon threads. These threads are generally ‘Service provider’ threads. They should not be used to execute your program code but system code. These thread run in parallel to your code but JVM can kill them anytime. When JVM finds no user threads it stops and all daemon thread terminate instantly. Thus you should never depend on daemon thread to perform any program code.
Events with Threading
Use events with thread; this is one of the techniques to synchronize one thread with other like ManualResetEvent
Difference between a computer process and thread
A single process can have multiple threads that share global data and address space with other threads running in the same process, and therefore can operate on the same data set easily. Processes do not share address space and a different mechanism must be used if they are to share data.
If we consider running a word processing program to be a process, then the auto-save and spell check features that occur in the background are different threads of that process which are all operating on the same data set (your document).
Process
In computing, a process is an instance of a computer program that is being sequentially executed[1] by a computer system that has the ability to run several computer programs concurrently.
Thread
A single process may contain several executable programs (threads) that work together as a coherent whole. One thread might, for example, handle error signals, another might send a message about the error to the user, while a third thread is executing the actual task
Interlocked class
Provides atomic operations for variables that are shared by multiple threads. Interlocked class provides methods by which you can achieve following functionalities :-
1. increment Values.
2. Decrement values.
3.Exchange values between variables.
4.Compare values from any thread.
in a synchronization mode.
Example :- System.Threading.Interlocked.Increment(IntA)
Using Statement
Defines a scope, outside of which an object or objects will be disposed.
using (Font font1 = new Font(“Arial”, 10.0f))
{
}
C#, through the .NET Framework common language runtime (CLR), automatically releases the memory used to store objects that are no longer required. The release of memory is non-deterministic; memory is released whenever the CLR decides to perform garbage collection. However, it is usually best to release limited resources such as file handles and network connections as quickly as possible.
The using statement allows the programmer to specify when objects that use resources should release them. The object provided to the using statement must implement theIDisposable interface. This interface provides the Dispose method, which should release the object’s resources.
A using statement can be exited either when the end of the using statement is reached or if an exception is thrown and control leaves the statement block before the end of the statement.
using System;
class C : IDisposable
{
public void UseLimitedResource()
{
Console.WriteLine(“Using limited resource…”);
}
void IDisposable.Dispose()
{
Console.WriteLine(“Disposing limited resource.”);
}
}
class Program
{
static void Main()
{
using (C c = new C())
{
c.UseLimitedResource();
}
Console.WriteLine(“Now outside using statement.”);
Console.ReadLine();
}
}
Output:
Using limited resource…
Disposing limited resource.
Now outside using statement.
Difference Between Finalize and Dispose Method
.NET Framework provides two methods Finalize and Dispose for releasing unmanaged resources like files, database connections, COM etc. This article helps you to understand the difference between Finalize and Dispose method.
Finalize vs dispose method

Implementing Finalize method (with dispose())
If you want to implement Finalize method, it is recommended to use Finalize and Dispose method together as shown below:
// Using Dispose and Finalize method together
public class MyClass : IDisposable
{
private bool disposed = false;
//Implement IDisposable.
public void Dispose()
{
Dispose(true);
GC.SuppressFinalize(this);
}
protected virtual void Dispose(bool disposing)
{
if (!disposed)
{
if (disposing)
{
// TO DO: clean up managed objects
}
// TO DO: clean up unmanaged objects
disposed = true;
}
}
//At runtime C# destructor is automatically Converted to Finalize method
~MyClass()
{
Dispose(false);
}
}
Note
- It is always recommended to use Dispose method to clean unmanaged resources. You should not implement the Finalize method until it is extremely necessary.
- At runtime C#, C++ destructors are automatically Converted to Finalize method. But in VB.NET you need to override Finalize method, since it does not support destructor.
- You should not implement a Finalize method for managed objects, because the garbage collector cleans up managed resources automatically.
- A Dispose method should call the GC.SuppressFinalize() method for the object of a class which has destructor because it has already done the work to clean up the object, then it is not necessary for the garbage collector to call the object’s Finalize method.
Design Patterns
Design patterns are recurring solutions to software design problems you find again and again in real-world application development. Patterns are about design and interaction of objects, as well as providing a communication platform concerning elegant, reusable solutions to commonly encountered programming challenges.
The Gang of Four (GoF) patterns are generally considered the foundation for all other patterns. They are categorized in three groups: Creational, Structural, and Behavioral. Here you will find information on these important patterns.
To give you a head start, the C# source code is provided in 2 forms: ‘structural’ and ‘real-world’. Structural code uses type names as defined in the pattern definition and UML diagrams. Real-world code provides real-world programming situations where you may use these patterns.
A third form, ‘.NET optimized’ demonstrates design patterns that exploit built-in .NET 4.0 features, such as, generics, attributes, delegates, object and collection initializers, automatic properties, and reflection.
| Creational Patterns | |
| Abstract Factory | Creates an instance of several families of classes |
| Builder | Separates object construction from its representation |
| Factory Method | Creates an instance of several derived classes |
| Prototype | A fully initialized instance to be copied or cloned |
| Singleton | A class of which only a single instance can exist |
| Structural Patterns | |
| Adapter | Match interfaces of different classes |
| Bridge | Separates an object’s interface from its implementation |
| Composite | A tree structure of simple and composite objects |
| Decorator | Add responsibilities to objects dynamically |
| Facade | A single class that represents an entire subsystem |
| Flyweight | A fine-grained instance used for efficient sharing |
| Proxy | An object representing another object |
| Behavioral Patterns | |
| Chain of Resp. | A way of passing a request between a chain of objects |
| Command | Encapsulate a command request as an object |
| Interpreter | A way to include language elements in a program |
| Iterator | Sequentially access the elements of a collection |
| Mediator | Defines simplified communication between classes |
| Memento | Capture and restore an object’s internal state |
| Observer | A way of notifying change to a number of classes |
| State | Alter an object’s behavior when its state changes |
| Strategy | Encapsulates an algorithm inside a class |
| Template Method | Defer the exact steps of an algorithm to a subclass |
| Visitor | Defines a new operation to a class without change |
A good explanation can be found at : http://www.dotnetuncle.com/Design-Patterns/dot-net-design-pattern-interview-questions.aspx

Recent Comments